 (1 votes, average: 5.00 out of 5)
It’s always fun to do something more with a product than what’s visible on the surface. By itself, OfficeFX Professional is a great product that lets you bring in animated, moving backgrounds into your PowerPoint slides, much like television style backdrops. But let’s face it, at some time, you’ll want to bring in some other movie background for your PowerPoints. Fortunately, it’s easy to do that as long as your movie clips fulfill these requirements:
- They should be of high quality.
- They should not be too crowded. Look at clips that contain one or two colors so that any text or other visuals placed over them has sufficient contrast to stand out.
- They should be loopable, so that even a small movie clip can work.
- The clips need to be in a compatible file format. AVIs work great, although MPEGs and WMVs can be used as well. Stay away from QuickTime MOVs though.
Many such movie clips can be found in Digital Juice’s Jump Backs library, and there are other sources too.
Once you have chosen a movie clip, follow these steps:
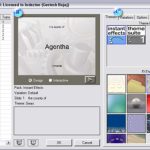
- Choose a simple theme (see note in the end of this post) in OfficeFX Professional and add a Standard default video scene to any slide within the Insert tab, as shown in Figure 1, below.
- Once you have selected the video you want to play in the background, set that video to:
- Repeat Continuously (that’s the default).
- Set the Placement to Maximize so that it takes up the full screen.
- Uncheck the Interactive option so the insert scene will not respond to user mouse clicks.
- Select the Place Behind PowerPoint Content option. That’ll display the video behind your PPT content.
- Now, click the Assign to All button.

Figure 1: Match your screen with these options
That’s all you need to do! Now, in PowerPoint you’ll see that OfficeFX has placed a stand-in image that represents your video on all the slides. It’s no longer an option to have the stand-in image or not. If you’ve got a video insert added, its stand-in image is always displayed in PowerPoint. This maintains the WYSIWYG relationship between PowerPoint and OfficeFX. What you can do is select the stand-in image in PowerPoint and change its display order to push it to the back. You’ll then see all your PowerPoint content on top of it.

Thanks to Mike Wilson of Instant Effects for help in creating this quick tutorial!
I did mention that you should use a simple theme for this tutorial, and Mike provides more insight:
The recommended theme for this approach is “Light Pools” from the standard Instant Effects theme pack. The why is because when you do a video background this way, the 3D elements of whatever theme you choose are still being played behind your video. With Light Pools, those 3D elements are very simple. They cause virtually zero overhead and won’t slow down your display.
You May Also Like: OfficeFX review
Related Posts
 Instant Effects announced the release of version 2.6 of both OfficeFX and OfficeFX Professional, their PowerPoint add-in that metamorphoses the look a...
 Mike Wilson is a founder and VP of Business Development at Instant Effects, Inc. in Santa Barbara, CA. In this Indezine exclusive article,...
 The folks at think-cell just announced that their add-in will now work within Microsoft Office for Mac as well. This is probably the biggest new featu...
 Jamie Garroch, CEO of YOUpresent (formerly GMARK) founded the company to provide presentation professionals with presentation software, content and tr...