![]()
This is the print version of this page. All content is copyright Indezine.com 2000-2026.
![]()
Thoughts and impressions of happenings in the world of PowerPoint and presentations, continuously updated since 2003.
See Also:
PowerPoint and Presenting Notes
PowerPoint and Presenting Glossary
We have a new look newsletter starting this week! There’s a 3 petal variation of our circle graphic available now. PowerPoint 2010 users will learn more Slide Master techniques, PowerPoint 2013 users can explore options to customize the Ribbon and its tabs, and PowerPoint 2011 for Mac users are encouraged to learn more about Chart Axes. There are some Valentine Day goodies and 4 amazing guest posts or interviews by Sandra Schrift, Shawn Toh, Jim Confalone, and Dan Davenport. We hope you enjoy this newsletter!
![]()
Read all this and more in Indezine News.
Filed Under:
Ezine
Tagged as: Ezine, Indezine, News, PowerPoint
Comments Off on Indezine News: February 5, 2013
The other day a friend asked me how she could add a trigger animation to a slide object – but with a difference! She inserted a picture on a slide (let’s call this Picture 1) and then placed another picture of the exact same size over the first one (let’s call this Picture 2). She then wanted to click Picture 2 to cause a trigger animation on Picture 1 – this caused Picture 1 to be revealed, almost like the example explained in our Trigger Animations in PowerPoint 2010 tutorial. However, what she wanted next was to click on Picture 1 to reveal Picture 2. So to put this in a few words, this is what she wanted: Click on Picture 2 to reveal Picture 1 (and hide Picture 2); and Click on Picture 1 to reveal Picture 2 (and hide Picture 1).

Learn how to add a twin trigger animation in PowerPoint 2010 for Windows.
Filed Under:
PowerPoint 2010
Tagged as: Animation, PowerPoint 2010, Tutorials
Comments Off on Learn PowerPoint 2010 for Windows: Twin Trigger Animation
Axes in PowerPoint charts are typically positioned on the left and bottom of the plot area. But there may be scenarios when you want your axes to cross each other within the plot area rather than be located on its edges. Attaining such a crossed axes can be desirable due to a variety of reasons in both the Value and Category axes.
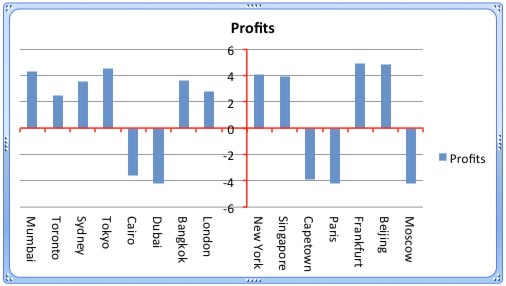
Learn how to add and alter the position of crossed axes in PowerPoint 2011 for Mac.
Filed Under:
PowerPoint 2011
Tagged as: Charting, Office for Mac, PowerPoint 2011, Tutorials
Comments Off on Learn PowerPoint 2011 for Mac: Crossed Axes for Charts

Peter Zvirinsky is a slide designer and the founder of infoDiagram, a website for pre-designed presentation slides and PowerPoint visual elements. Peter also runs Prezentio, a slide design company where they create tailor-made presentation slides for various companies. Peter loves changing textual information into simple diagrams and he wants to inspire others to use this visualization process in everyday life.
In this conversation, Peter discusses hand-drawn elements created by his infoDiagram site.
Geetesh: Your hand-written symbols set has an amazing collection of hand drawn elements such as scribbles, lines, shapes, icons, etc. How will slides created using these elements help audiences understand concepts better?
Peter: Thank you for your appreciation, Geetesh. Indeed, we have spent quite some time preparing all these sketch-like icons and shapes.
These hand-drawn elements serve as an unconventional way to make a presentation more personal and eye-catching. They help to understand the concepts as a unique instrument to underline the key message of a slide.
According to Presentation Zen guidelines by Garr Reynolds, one slide should represent one idea. If you have a slide with more information elements, perhaps a longer text, a table, or a data chart, you still should show the audience where the one key message is.
This is where handwritten elements are handy. They are a nice way to point out that key message. For example, you can underline the key data bar in your chart with a charcoal oval, arrow, or speech balloon.

When using such additional elements, people should not forget about design consistency. Don’t mix more than two handwritten styles in one presentation. For example, use only charcoal style or only ink style elements.
Geetesh: The hand-drawn elements in this collection include actual slide elements such as charts, shapes, tables, etc. Additionally, they also include highlight elements such as a highlighted circle, arrows of all types, and even symbols of people. Can you tell us about a few ways in which we can use and combine all these elements?
Peter: With pleasure. Our goal was to create a comprehensive toolbox, based on our design experience and customer feedback.
![]()
You can check more examples in my blog Simple visualization of ideas where those elements are used to illustrate interesting Seth Godin blog posts, for example. If anyone wants to contribute with his or her own examples, I’ll be glad to talk. Feel free to contact me via infoDiagram contact page.
In general, the handwritten set serves as a motivation to use drawings in presentations. When you have such collection and examples of usage, it is easier to start creating visual diagrams or illustrations and, thus, create presentations that are memorable and easy to understand. Using hand drawn elements can go beyond PowerPoint slides. Our handwritten icons have been used for e-books and blogs illustrations.
I think we all love to draw from our early age — just take a look at kids. Yet, sometimes we feel we lack the skills to create nice-looking visuals. Typing a text slide is faster than creating its visual representation. That’s where we want to help people by giving them ready-made sets of elements, as well as visualization examples.
The views and opinions expressed in this blog post or content are those of the authors or the interviewees and do not necessarily reflect the official policy or position of any other agency, organization, employer, or company.
Filed Under:
Interviews
Tagged as: Graphics, Interviews, Peter Zvirinsky, PowerPoint, Templates
Comments Off on Hand Drawn PowerPoint Elements: Conversation with Peter Zvirinsky
If you want to customize your Ribbon in PowerPoint 2013, you’ll want to add some of the commands that were not placed by default within any of the Ribbon tabs. Or maybe you want a particular command available on the Home tab of your Ribbon. Whatever your intent may be, you cannot place any commands within the existing groups that are built within PowerPoint. You first need to add a custom group within any of the tabs available in the Ribbon. Thereafter, you need to populate them with commands.

Learn how to add commands to custom groups in PowerPoint 2013 for Windows.
Filed Under:
PowerPoint 2013
Tagged as: PowerPoint 2013, Tutorials
Comments Off on Learn PowerPoint 2013 for Windows: Adding Commands to Custom Groups
Microsoft and the Office logo are trademarks or registered trademarks of Microsoft Corporation in the United States and/or other countries.