 (2 votes, average: 5.00 out of 5)
Quick, can you answer this question? You selected the AutoShape and want to add or edit a gradient. How many clicks away are you from the Gradient dialog box?
Did you answer 3, 2, or 1?
3 Clicks
You select the AutoShape and choose the Format | AutoShape option. Or you might right-click the AutoShape and choose Format AutoShape…. Then, click the downward pointing arrow next to Color and choose Fill Effects in the resultant dropdown box. This gets you to the Gradient tab of the Fill Effects dialog box.
2 Clicks
You double-click the AutoShape to get to the Format AutoShape dialog box. Then click the downward pointing arrow next to Color and choose Fill Effects in the resultant drop-down list. Doing so gets you to the Gradient tab of the Fill Effects dialog box.

1 Click
You select the AutoShape and click on the downward pointing arrow next to the Fill icon on the Drawing toolbar (the icon that looks like a paint can). In the resultant flyout menu, choose the Fill Effects option. Doing so gets you straight to the Gradient tab of the Fill Effects dialog box.
Related Posts
 Have you seen charts that were not filled with solid color fills or geometric patterns, but rather with pictures? For instance, if you wanted to show ...
 In previous tutorials, we have covered solid, gradient, texture and pattern fills for AutoShapes in PowerPoint 2003 or earlier versions. In this tutor...
 Other than solid fills and gradient fills, PowerPoint 2003 for Windows and previous versions also include three other fill types: textures, patterns, ...
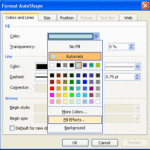 Patterns in PowerPoint are two-color designs comprising patterns like lines, dots, dashes, and checks. PowerPoint includes 48 patterns, such with name...