![]()
This is the print version of this page. All content is copyright Indezine.com 2000-2026.
![]()
Thoughts and impressions of happenings in the world of PowerPoint and presentations, continuously updated since 2003.
See Also:
PowerPoint and Presenting Notes
PowerPoint and Presenting Glossary
A placeholder is a boilerplate container that you can use to fill in with some sort of content. When you launch PowerPoint, you will see those distinctive boxes that invite you to add some content — haven’t you noticed the “Click to add title” suggestions? All these boxes are placeholders — when selected, these boxes have a grey border around them. You can add your own custom placeholders to the various slide layouts in PowerPoint.

Learn how to add new placeholders within slide layouts in PowerPoint 2011 for Mac.
Filed Under:
PowerPoint 2011
Tagged as: Office for Mac, PowerPoint 2011, Templates, Tutorials
Comments Off on Learn PowerPoint 2011 for Mac: Insert New Placeholders within Slide Layouts
Your slides remain the same — yet exploring the same slides using a different view makes sense, depending upon the tasks you want to do. For example, it’s easier to reorder and work with multiple slides in Slide Sorter view — and make changes to individual slides in Normal view. All put together, PowerPoint 2013 provides you will ten different views. Eight of these views can be accessed from the View tab of the Ribbon. Then click on any of the buttons in the Presentation Views and Master Views group.

Learn about various views that allow you to edit and show slides in PowerPoint 2013 for Windows.
Filed Under:
PowerPoint 2013
Tagged as: PowerPoint 2013, Tutorials
Comments Off on Learn PowerPoint 2013 for Windows: Views
Making PowerPoint interactive is to make your slides do what you want, allowing yourselves to go from slide to slide almost like going from one room to another in your home — and setting your slides in a way that allows you to work better — again, that’s akin to arranging the furniture in your home so as to make movement and work easier. Even if you step out of the comfort of your home, you can make your life more gratifying by discovering streets that are not too crowded with traffic so that you can get to your office faster, and with less stress! In the world of slides, those streets are the shortcuts you press to quickly navigate from one point in your presentation to another – and back.
Yes, interactivity is certainly as simple as the examples provided — and it also requires enough patience and practice to master. Once you do master interactivity, the results are worth it — you will be resoundingly successful in everything you do, and certainly will make a great impression while presenting!
Presenting imitates life in many more ways -– including the 3 elements that make up interactivity in our PowerPoint slides:
These three elements are present wherever there is interactivity! They play a vital part when you click (action) on a button (anchor) on your slide to launch (result) another application altogether. But look at these everyday examples that have nothing to do with slides – but they do include these 3 elements (these will be explained in a webinar I discuss at the end of this post):

How slides imitate life is not important because we need to learn how to imitate — rather, it’s important because we no longer have to imitate. We do these tasks every day that use interactivity — that’s built inside us from the day we were born, and there’s no reason why we cannot use this natural interactive ability with our slides!
Interactivity in life is something that we take for granted. We never take a second look — it’s just there like you unconsciously change gears while driving or push away water while swimming. It’s the same with your slides — interactivity works best when it appears effortless.
But there still are preset directions for efforts — you always push away water while swimming rather than drown yourself in it. Interactivity with slides has three such directions:
All this and more will be explored during a webinar called Making PowerPoint Interactive that I am doing on June 11th, 2013 — you will learn about:
Looking forward to seeing you at the webinar! This webinar is being organized by Harbinger, the folks who create Raptivity applications. The webinar is being held on June 11, 2013 at 11 am India time (this time, we’ve chosen an Asia Pacific friendly time).
Filed Under:
Presentation Skills
Tagged as: PowerPoint, Presentation Skills
Comments Off on Making PowerPoint Interactive: A Webinar
The default Slide Layouts available in PowerPoint help you choose various placeholder arrangements for your slide content — it’s easy to create good looking slides using them. As an analogy, duplicating and editing a Slide Layout is more like using a coloring book to fill color between the lines of pre-drawn art — but creating your Slide Layout from scratch is more like starting with a blank sheet of paper and drawing your art before you start coloring between the lines. Decide which of these approaches works best for you before starting. If you prefer the latter approach, follow these steps to create a new Slide Layout.
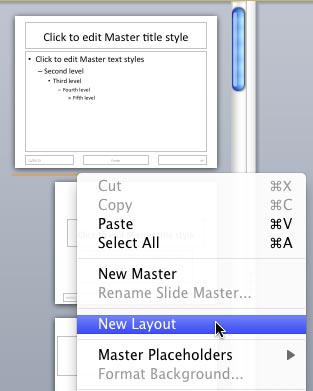
Learn how to add a new slide layout within Slide Master view in PowerPoint 2011 for Mac.
Filed Under:
PowerPoint 2011
Tagged as: Office for Mac, PowerPoint 2011, Templates, Tutorials
Comments Off on Learn PowerPoint 2011 for Mac: Add a New Slide Layout
Are you still confused about choosing between Office 2013 or Office 365? We help you decide by spelling out the similarities and the differences. And if you use many pictures on your PowerPoint slides, you will love Flickr as a source of free Creative Commons pictures — but do you know that you must attribute the source — we show you how. Electric Slide 2 is the newest version of a cool iPad presenting program that works with PowerPoint and Keynote files — Jim Phelan discusses more in this exclusive interview. We have another awesome with interview with Don Brittain of Instant Effects Presenter — this product lets you create perfect 3D presentations from your PowerPoint slides. For PowerPoint 2013 users, we look at cool tricks that you can use with the new Eyedropper tool. And we look closely at the Task Panes and the Status Bar in PowerPoint 2013, again. PowerPoint 2011 for Mac users can learn more about background styles for Slide Layouts — and adding your own custom backgrounds.

Read Indezine’s PowerPoint and Presenting News.
Filed Under:
Ezine
Tagged as: Ezine, Indezine, News, PowerPoint
Comments Off on PowerPoint and Presenting News: June 4, 2013
Microsoft and the Office logo are trademarks or registered trademarks of Microsoft Corporation in the United States and/or other countries.