![]()
This is the print version of this page. All content is copyright Indezine.com 2000-2026.
![]()
Thoughts and impressions of happenings in the world of PowerPoint and presentations, continuously updated since 2003.
See Also:
PowerPoint and Presenting Notes
PowerPoint and Presenting Glossary
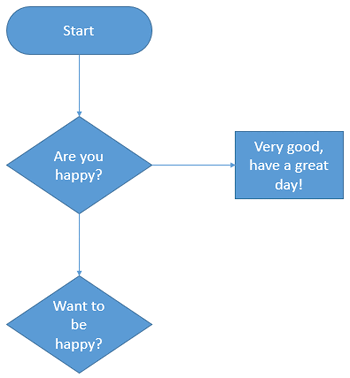
There are many dedicated programs that only do flowcharts, and even Microsoft creates another program called Visio that’s more flowchart savvy than mainstream Microsoft Office programs – even then, we highly recommend that you create your flowcharts within your Office program such as Word, Excel, and PowerPoint! Why do we put forth such a recommendation? That’s because Microsoft Office programs already have all the abilities and options you need to create almost any type of flowchart you need.
Filed Under:
PowerPoint 2013
Tagged as: Diagrams, Flowcharts, Graphics, Office 2013, PowerPoint 2013, Tutorials
Comments Off on Learn PowerPoint 2013 for Windows: Basic Flowcharts
The Ribbon made its debut in Office 2011 versions of PowerPoint, and other programs such as Word and Excel — as such, it is a new interface component that replaces the Elements Gallery in Office 2008 for Mac. Although the Ribbon in its default state is sophisticated and easy to use, you can make it work for you even better by learning some cool options, and by also customizing it to some extent, as explained in the following steps.
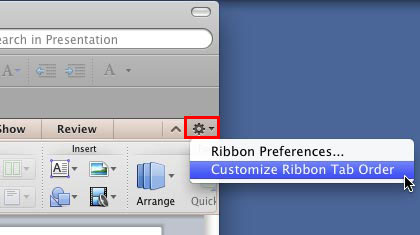
Learn how to work better with the Ribbon in PowerPoint 2011 for Mac.
Filed Under:
PowerPoint 2011
Tagged as: Office for Mac, PowerPoint 2011, Tutorials
Comments Off on Learn PowerPoint 2011 for Mac: Working with the Ribbon
Do your animations appear a little jerky while playing in PowerPoint 2010 or 2013 compared to how they played in PowerPoint 2007 (all Windows versions)? There could be any number of reasons why the animations may not play smoothly. You may have too many applications using resources in the background, or your graphics system may not be able to cope up.
However, when the same animations play well on PowerPoint 2007, and do not in versions 2010 and 2013 (sometimes, even on the same computer), then, this easy trick may help!

Figure 1: PowerPoint Options
If you are on PowerPoint 2010, check the option called Disable hardware graphics acceleration, as shown highlighted in blue within Figure 1, above.
If you are on PowerPoint 2013, also check the option called Disable Slide Show hardware graphics acceleration. If this option is (or options are) already checked, leave them.
Click the OK button to apply these changes. You can now close all instances of PowerPoint.
To run the Registry Editor on Windows 7 or 8, click the Windows key on your keyboard to access the Start Menu. Now, type Run to bring up an icon for the Run program. Click this icon so that you see the Run dialog box, as shown in Figure 2, below.

Figure 2: Run dialog box
Now, type in regedit inside the Run dialog box. Click the OK button.

Figure 3: User Account Control

Figure 4: Registry Editor
If you are using PowerPoint 2010, you will navigate to the similar HKEY_CURRENT_USER\Software\Microsoft\Office\14.0\PowerPoint\Options key.

Figure 5: Add a new DWORD Value

Figure 6: Replace existing text…

Figure 7: ..with a new DWORD Value

Figure 8: Edit DWORD Value
Animations in your presentation should now be smoother!
Thanks to several folks who contributed to this post, which brings us to some history.
Someone named Amy first raised this issue in the Comments section of the PowerPoint Blog, and then posted on Microsoft Answers.
Christopher Maloney of Microsoft responded with the solution. And thanks to Steve Rindsberg, PowerPoint MVP who rediscovered this treasure. Thanks thereafter to Glenna Shaw who provided further input on this solution.
Filed Under:
PowerPoint All Versions
Tagged as: Animation, PowerPoint 2010, PowerPoint 2013, Troubleshooting
The problem with handwritten fonts is that most of them are not too readable, especially when you use a smaller text size. We searched through all web resources to find these 3 free, handwritten fonts — enjoy using these fonts in your slides or anywhere else — do remember though that some of these fonts will not travel with your slides — so use only if you are presenting your slides on the same computer where these fonts were installed.

Explore our favorite free handwritten fonts.
Filed Under:
Fonts
Tagged as: Fonts, PowerPoint
Comments Off on 3 Free and Favorite Handwritten Fonts
Slides are virtual – and that makes them great candidates to add all sorts of virtual stuff that looks “real”! Just like these hand crafted “map pin” graphics – these map pins are easy to use. This complete collection that you will find in the downloaded ZIP file contains more than 300 map pins – not only the 10 that are shown on this page. The map pin graphics are already placed in PowerPoint slides you will download – just copy the individual pin you want, and then paste the pin within your own slides that already contain a map. Beyond maps, you can also use these map pins like regular push pins so that a picture, shape, or anything else appears as if it has been pushed onto a surface, board, or wall with a pin!

Download and use these map pins in your slides.
Filed Under:
Presentation Bank
Tagged as: Design, Graphics, PowerPoint, Presentation Samples
Comments Off on Handmade Slides: Map Pins for PowerPoint – 09
Microsoft and the Office logo are trademarks or registered trademarks of Microsoft Corporation in the United States and/or other countries.