PowerPoint and Presenting Stuff - Page 797 of 1224


PowerPoint and Presenting Stuff

Thoughts and impressions of happenings in the world of PowerPoint and presentations, continuously updated since 2003.

See Also:
PowerPoint and Presenting Notes
PowerPoint and Presenting Glossary

« Older EntriesNewer Entries »


Monday, July 30, 2012, posted by Geetesh Bajaj at 9:45 am

Each Theme contains several unique facets that set it apart from other Themes. These include Theme Fonts, Theme Colors, and Theme Effects. When you apply a different Theme to your PowerPoint presentation, the fonts, colors, and effects applied to your slides change. Unless you override this on a per slide basis, these changes show up in all slides in the presentation. The resulting slides all look consistent. If you explore examples of the same slide with different Themes applied, you will notice that all the slides differ in terms of colors, fonts, and effects applied. Yet the text content is still the same.

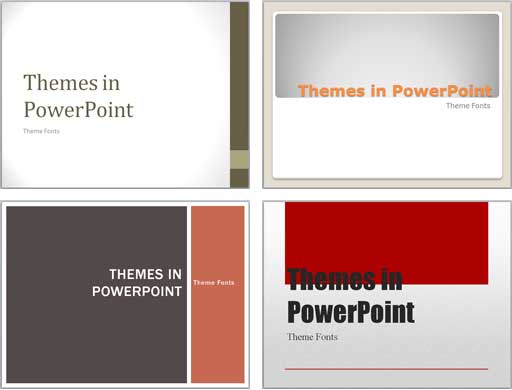
Explore what Theme Fonts are in PowerPoint 2007 and 2010 for Windows.

Filed Under: PowerPoint 2010
Tagged as: , , , ,

Comments Off on Learn PowerPoint 2010 for Windows: Theme Fonts


Monday, July 30, 2012, posted by Geetesh Bajaj at 9:30 am

Important:

This post refers to the Office 2013 Preview — this was pre-release software that is no longer available. All techniques mentioned in this post will not work with the final release version of Office 2013.

In previous posts, we have explored about Getting the Office 2013 Customer Preview Beta and Before Installing Office 2013 Customer Preview. Now let’s take you step-by-step through the entire install process. All through this post, you will find screenshots — feel free to click on the actual screenshots to see larger representations.

  1. Go to the Office 2013 Customer Preview site, and click the large green Sign Up button.
  2. 7-25-2012 3-21-46 PM

    7-25-2012 3-21-46 PM

  3. This gets you to the Welcome to the new Office screen — unless you want to Learn more, click the Try now link.
  4. 7-25-2012 3-22-10 PM

    7-25-2012 3-22-10 PM

  5. You now need to sign into your Microsoft account — this is essentially your Windows Live account — also if you have a Hotmail, MSN, or XBox Live account — then you already have a Microsoft account. You can sign in with your Microsoft account — or do what I did, and create a new account altogether just for this beta.
  6. 7-25-2012 3-25-32 PM

    7-25-2012 3-25-32 PM

  7. If you successfully signed in (or signed up), you will see the screen shown below. Click the green Get started now button.
  8. 7-25-2012 3-26-05 PM

    7-25-2012 3-26-05 PM

  9. You’ll now see the Welcome to your account page screen — just go ahead and click the green Install button.
  10. 7-25-2012 3-26-36 PM

    7-25-2012 3-26-36 PM

  11. You’ll see a message right near your browser’s status bar (at least in Internet Explorer) that asks you if you want to run or save the installation file — go ahead and click the Run option.
  12. 7-25-2012 3-27-45 PM

    7-25-2012 3-27-45 PM

  13. Next, you will see an indication of the installation beginning, and then connecting to your account — see the two screenshots below.
  14. 7-25-2012 3-29-31 PM

    7-25-2012 3-29-31 PM

    7-25-2012 3-31-38 PM

    7-25-2012 3-31-38 PM

  15. And then you see the screen that believes you will love Office — click the Next button to continue.
  16. 7-25-2012 3-36-57 PM

    7-25-2012 3-36-57 PM

  17. Now you need to accept the Microsoft license agreement by clicking the Accept button.
  18. 7-25-2012 3-37-33 PM

    7-25-2012 3-37-33 PM

  19. And now for something you would least expect — a small video clip about the new Office — here are two screenshots from the video.
  20. 7-25-2012 3-38-00 PM

    7-25-2012 3-38-00 PM

    7-25-2012 3-38-12 PM

    7-25-2012 3-38-12 PM

  21. OK, now you must sign in — again! We know you already signed in, but that one was for the installation site — and this one is for your local computer — so press the orange Sign In button. Notice the smiling and frowning faces on the top right — click those to tell Microsoft if you are happy or not!
  22. 7-25-2012 3-38-25 PM

    7-25-2012 3-38-25 PM

  23. Now you actually sign in — use the new Microsoft ID you created.
  24. 7-25-2012 3-38-50 PM

    7-25-2012 3-38-50 PM

  25. Now you are welcomed — and you can also choose a patterned theme for your Office 2013 program interface — we just chose the None option. Then click the Next button.
  26. 7-25-2012 3-39-45 PM

    7-25-2012 3-39-45 PM

  27. You next meet SkyDrive, Microsoft’s cloud storage solution — click the Next button to proceed.
  28. 7-25-2012 3-40-00 PM

    7-25-2012 3-40-00 PM

  29. Now Microsoft wants you to take a look at some other great stuff while they wrap things up — we just politely clicked the No thanks option.
  30. 7-25-2012 3-40-25 PM

    7-25-2012 3-40-25 PM

  31. Now the actual installation starts — it seems to start from 14% rather than 0% or 1%. Be prepared for a long wait.
  32. 7-25-2012 3-40-42 PM

    7-25-2012 3-40-42 PM

    7-25-2012 4-09-21 PM

    7-25-2012 4-09-21 PM

  33. And then after an hour and half, our installation was done. We tested this installation on a 4 mbps online connection.
  34. 7-25-2012 4-41-12 PM

    7-25-2012 4-41-12 PM

  35. Launch your program — we launched PowerPoint 2013. In a few moments, the program was automatically activated.
  36. 7-25-2012 4-50-41 PM

    7-25-2012 4-50-41 PM

Filed Under: PowerPoint 2013
Tagged as: ,

Comments Off on Step-by-Step Install of the Office 2013 Customer Preview


Saturday, July 28, 2012, posted by Geetesh Bajaj at 9:35 am

Important:

This post refers to the Office 2013 Preview — this was pre-release software that is no longer available. All techniques mentioned in this post will not work with the final release version of Office 2013.

All you need to do is go to the Office 2013 Customer Preview site, and follow the instructions to quickly install a beta version of Office 2013 on your computer. Well, not all of that was true — we are not saying that it’s a herculean task to install this Customer Preview, but it’s no piece of cake either!

First of all, you must fulfill the following prerequisites and recommendations:

  1. You must be running either Windows 7 or 8 — of course the latter has not yet released, and is only available in a Preview version, much like Office 2013.
  2. Make sure you have a full backup of your system — and ideally this should not be your primary work environment — we know many users will not care and still go ahead with this install — but we did warn you!
  3. If possible, consider installing Office 2013 on a virtual environment — this means that you can create a virtual machine using VMware Workstation, Microsoft Virtual PC, or VirtualBox. The latter two are free, while you will have to buy a license for VMware’s Workstation product. VMware also creates Fusion, a product that lets you create Windows virtual machines on your Mac. The benefit of using a virtual machine is that you can remove the entire machine with just one Delete action, and the rest of your computer remains unaffected with all pre-release software.
  4. You can use any web browser to visit the install site, and thereafter install Office — but we strongly recommend you use Internet Explorer.
  5. You also need lots of time — bargain for at least two hours if you have a very fast internet connection. If you have a slow connection, then start this process in the morning at your office — or in the evening at home. Make sure you have no appointments for a few hours!

The Office 2013 Customer Preview will install on a computer that already has an older version of Microsoft Office installed — but be warned that the new version of Outlook will not co-exist with any older version of the same program. It’s a known fact that you can have only one version of Outlook installed on your system. Again, make sure you install Office 2013’s Customer Preview version only on a test system or a virtual machine.

We have already explained some install options in our Getting the Office 2013 Customer Preview Beta post. In the next post of this series, we will explore the actual installation process.

7-25-2012 3-21-46 PM

7-25-2012 3-21-46 PM

Filed Under: PowerPoint 2013
Tagged as: ,

Comments Off on Before Installing Office 2013 Customer Preview


Saturday, July 28, 2012, posted by Geetesh Bajaj at 9:30 am

Here are some silhouettes of businesspeople in a meeting environment. Since these silhouettes are neutral visuals, they are the best options to be considered when you are presenting to an international audience. These also work great in scenarios like surveys and legal presentations. These business meeting themed silhouettes are contained within the sample PowerPoint presentation that you will download. You will find them in two colors, black and white, on two different slides, and also some other variations using PowerPoint’s native fills, lines and effects. Go ahead and change the PowerPoint fills, lines, and effects to create your personalized versions of these silhouettes, and explore what works best for you to make them look great on your PowerPoint slide.

Use these silhouette graphics in your slides.

Filed Under: Presentation Bank
Tagged as: , ,

Comments Off on Business Meetings Silhouettes for PowerPoint – 02


Friday, July 27, 2012, posted by Geetesh Bajaj at 9:30 am

While working with Motion Paths, especially after drawing a Custom Motion Path to animate your slide object, you may feel that the path drawn is not very smooth. Or you may have used one of the preset Motion Paths to animate your slide object, and now you want to make some changes. Maybe you want to extend the path, or use smoother corners rather than the default pointed ones. Drawing with a mouse typically results in paths that look more segmented than curved!

Learn PowerPoint 2011 for Mac: Edit Points for Motion Paths

Learn PowerPoint 2011 for Mac: Edit Points for Motion Paths

Learn how you can edit Motion Paths using the Edit Points option in PowerPoint 2011 for Mac.

Filed Under: PowerPoint 2011
Tagged as: , , ,

Comments Off on Learn PowerPoint 2011 for Mac: Edit Points for Motion Paths


« Older Entries « » Newer Entries »


Microsoft and the Office logo are trademarks or registered trademarks of Microsoft Corporation in the United States and/or other countries.

Plagiarism will be detected by Copyscape

© 2000-2026, Geetesh Bajaj - All rights reserved.

since November 02, 2000